Note : Les descriptions sont présentées dans la langue officielle dans laquelle elles ont été soumises.
CA 02857634 2014-07-23
08928781CA
METHOD OF DIGITALLY CONSTRUCTING A PROSTHESIS
BACKGROUND OF THE INVENTION
1. Field of the Invention
The present invention relates to prosthetics. More particularly, the present
invention relates to a novel process for constructing a prosthetic limb
through a series of
fabrication steps including retrieving a file from a computer, manipulating
that file that
has captured alignment and socket fit, then having to adjust each "Z" line in
the file to
insure the strongest build of the socket with proper trim lines, sending it to
a 3D printer,
which in turn has the ability to print out a completed, wearable prosthetic
limb
constructed of a material, preferably Nylon 12, but other suitable materials
may include
ULTEM , strong plastic material, such as ULTEM (A Registered Trademark of
General Electric Co.), carbon fiber, or other material of equal or greater
strength that may
be known or developed in the future; and which provides that the inner and
outer surfaces
of the prosthetic socket undergo a process to smooth and seal the surfaces to
improve the
wearability.
2. General Background of the Invention
The design of an effective prosthetic socket is crucial to the rehabilitation
and
overall health of a person with an amputated limb. Most of the time and energy
a
practitioner applies in making a prosthesis is spent on fabricating the socket
that must be
fitted to the residual limb. The prosthetic socket must be shaped so that it
supports the
residual limb in load tolerant areas, while avoiding irritation of sensitive
regions on the
limb that contact the inner surface of the socket. If these criteria are not
achieved, when
the patient uses the prosthesis, residual limb soft tissue breakdown often
occurs. The
result is painful sores, blisters, ulcers, or cysts on the residual limb that
typically restrict
continued prosthesis use, and in severe cases, necessitate a further
amputation to a higher
anatomical level, which can lead to further disability. The incidence of skin
breakdown
in lower-limb amputees has been reported to be from 24% to 41%. Accordingly,
at any
one time, as many as 41% of prosthesis users may be experiencing breakdown of
the
¨1¨
CA 02857634 2014-07-23
08928781CA
tissue on the residual limb. The principal cause of such breakdown is a poorly
fitting
prosthetic socket.
Practitioners face challenges in making quality sockets for the increasing
amputee
popularity. Also, there is a shortage of prosthetists in the industry, and
that shortage is
expected to increase in the future, as the demand for prosthetic devices
increases. A
prosthetist=s time is precious and must be used as efficiently as possible. It
will therefore
be evident that there is a need for technology to improve a prosthetist=s
efficiency, speed,
documentation, repeatability, and quality of fitting a socket to a patient=s
residual limb,
and to ensure a proper socket design early in the process of fitting a
prosthetic socket to a
recipient.
In the current state of the art, one way of capturing an image of a residual
limb in
order to gather a positive mold is by hand casting. The procedure one would
use in the
traditional format of hand casting would follow certain steps. The initial
step would
include the following materials and tools needed for measuring the patient:
stockinette,
plaster bandages, indelible pencil, preparations for suspension (example:
silicone liners,
foam liners, hard socket), also measuring tools such as a length stick M/L
gauge and tape
measure. These tools and materials would assist a prosthetist in taking the
proper cast
along with techniques they acquired through training.
After the proper cast has been taken by a certified individual, the
fabrication of
the test socket would be as follows. First, one would pour the negative mold
or cast in
order to receive the positive mold with a powder substance called plaster of
paris. Once
the plaster hardens, the next step is striping the plaster bandages off of the
mold. Then
the positive mold is modified by hand to achieve its voids and pressure points
in precise
locations with plaster of paris. After the desired reliefs are added it is
then ready for a
term used in the industry known as either drap pull or bubble pull. These are
techniques
in which a clear plastic is pulled over the positive model. Therefore, this
manual
technique for capturing an image of a residual limb in order to gather a
positive mold is
greatly improved upon by the use of a digital process as will be described
herein.
Patent No. Title Issue Date
7,447,558 Apparatus for Determining A Three 11-04-2008
Dimensional Shape of an Object
¨2¨
CA 02857634 2014-07-23
=
08928781CA
Patent No. Title
Issue Date
7,225,050 Method and Apparatus for Precisely
Fitting, 05-29-2007
Reproducing, and Creating 3-Dimensional
Objects from Digitized and/or Parametric
Data Inputs Using Computer Aided Design
and Manufacturing Technology
7,162,322 Custom Prosthetic Liner Manufacturing
01-09-2007
System and Method
6,463,351 Method for Producing Custom Fitted
10-08-2002
Medical Devices
2010/0161076 Orthotic or Prosthetic Cushioned Device and 06-24-2010
Method of Making the Same
2010/0023149 Computer Aided Design and Manufacturing 01-28-2010
of Transtibial Prosthetic Sockets
2006/0020348 Method and Associated System for 01-26-2006
Recording and Retrieving Fabrication and/or
Fitting Data Associated with a Prosthetic
Component
2006/0094951 Computer-
Aided-Design of Skeletal Implants 05-04-2006
BRIEF SUMMARY OF THE INVENTION
The method and process of the present invention solves the problems
confronted in the art in a simple and straightforward manner. What is provided
is a
process for making a prosthetic limb, wherein one would retrieve a manipulated
file from
a computer that has been through the test socket phase; that file will be
manipulated
through the definitive socket phase using specific 3D prosthetic software to
design the
socket for current practiced methods. Prior to sending to the printer, each
"Z" line in the
file would be adjusted to insure the strongest build of the socket with proper
trim lines;
Thereafter it will be ready to be sent to a 3D printer, which in turn has the
ability to print
out the prosthetic limb from a material, such as a strong plastic material,
ULTEM , or
carbon fiber, or other material of equal or greater strength that may be known
or
developed in the future.
More specifically, the steps in this inventive process include, first,
digitally producing a modified mold of a residual limb via 3D scanners and
software
known to the industry. A test socket would be constructed from the digitally
modified
mold and be equipped with an alignable system; for example, a pylon, along
with the
¨3¨
CA 02857634 2014-07-23
08928781CA
desired prosthetic foot. The test socket would be accurately scanned,
preferably with a
3D scanner, along with finalized alignment that has been recorded and adjusted
by a
certified practitioner to provide a 3-D Image of the finalized prosthetic
alignment. The
next step would be to transfer the finalized digital alignment of the test
socket to the
finalized digitally modified mold. Once the modified model has received the
transferred
alignment, one would proceed to fabricate the type of hookup in the socket;
i.e., plug fit,
four hole, support drop lock, or any other type of industry standard
connection or
accommodation via basic 3D software, including adjusting each "Z" line in the
file to
insure the strongest build of the socket with proper trim lines. Once the
desired
prosthetic attachment is finalized, the next step is to send the finished file
to a 3-D printer
to produce the definitive prosthetic device. One such printer is sold under
the trademark
of Fortus which would be utilized in this process designed by Stratasys, but
there may
be other such printers available. In earlier embodiments, the prosthesis would
be printed
out of a material such as ULTEM , or carbon fiber, or other material of equal
or greater
strength that may be known or developed in the future.
However, recent tests have shown that the prosthesis could be printed from a
product called Nylon 12, which appears to be a product that is equal to or may
be better
than ULTEM or carbon fiber. As background, Nylon is a generic designation for
a
family of synthetic polymers known generically as aliphatic polyamides, first
produced by
Dupont. Nylon is one of the most commonly used polymers. Key representatives
are
nylon-6,6; nylon-6; nylon-6,9; nylon-6,10; nylon-6,12; nylon-11; nylon-12 and
nylon-4,6.
Nylon 12 is a semi-crystalline engineering plastic with very high toughness
and
good chemical resistance for varied applications, including prosthetics. The
main
characteristics of Nylon 12 are very useful, which include that Nylon 12 is
extremely
tough; possesses good sliding properties; abrasion resistant; good chemical
resistance to
many oils, greases, diesel, petrol and cleaning fluid; light low water
absorption; Good
electrical insulation; and easily machined and dimensionally accurate; and
easily welded
and bonded.
As stated earlier, by utilizing this process, the prosthetist is allowed to
construct
the prosthesis with prosthetic techniques for attachments such as:
---Four hole hook up with vacuum
¨4¨
CA 02857634 2014-07-23
08928781CA
---Four hole hook up that will support a drop lock
---Fitting of pylon or adapters
---Custom attachments (for certain feet/attachment)
Therefore, it is a principal object of the present invention to provide a
prosthesis
and a method to fabricate a prosthesis constructed of a material, preferably
Nylon 12, but
other suitable materials may include ULTEM , carbon fiber, or other material
of equal or
greater strength that may be known or developed in the future, through the use
of digital
manipulation of a file that has captured the alignment and the socket
measurements, then
created a definitive prosthesis by a method which can be done in an efficient
rate and
manner than the conventional methods which are time consuming.
It is a further principal object of the present invention to provide a process
to
smooth and seal the inner and outer surfaces of the prosthetic socket to
improve the
wearability.
BRIEF DESCRIPTION OF THE SEVERAL VIEWS OF THE DRAWINGS
For a further understanding of the nature, objects, and advantages of the
present
invention, reference should be had to the following detailed description, read
in
conjunction with the following drawings, wherein like reference numerals
denote like
elements and wherein:
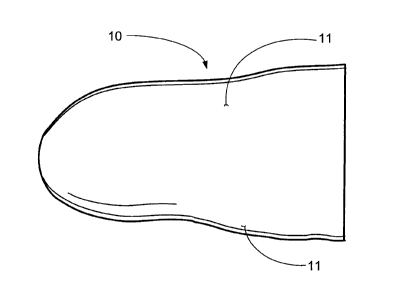
Figure 1 illustrates a modified mold of a residual limb digitally produced via
3D scanners and software;
Figure 2 illustrates a carving of the modified model before it goes with the
test
socket to be fabricated;
Figures 3A and 3B illustrate two views of a fabricated test socket which is
hooked up to an alignment or an alignable system respectively;
Figures 4A through 4B illustrate steps in the scanning of the test socket and
the alignment, with Figure 4C illustrating the captured alignment;
Figures 5A and 5B illustrate the modified mold and the beginning stages of
transferring alignment, illustrating the addition of the pylon;
Figure 6 illustrates the process of cross-referencing of the modified mold
with
the alignment attachment with the test socket with the correct alignment;
¨5¨
CA 02857634 2014-07-23
08928781CA
Figure 7 is the completed merge of the process illustrated in Figure 6 to
assure
the correct alignment;
Figure 8 is an image of the socket after alignment has been captured and with
the use of CAD software showing a four hole hookup adapted to the socket;
Figure 9 is an actual printout of the image in Figure 8 showing the four hole
hookup;
Figure 10 is a printout of the prosthesis which has a plug fit adaptor;
Figure 11 is a printout of the prosthesis which has a plug fit where a pylon
or
adaptor can be engaged; and
Figure 12 is a Flow Chart illustrating a preferred embodiment of the method or
process of constructing a prosthetic limb through a digital format; and
Figures 13 and 14 illustrate in Flow Chart format the steps of Smoothing the
prosthetic limb (3D socket) and Sealing the prosthetic limb (3D socket)
respectively.
DETAILED DESCRIPTION OF THE INVENTION
Figures 1 through 12 illustrate a preferred embodiment of the method or
process
of constructing a prosthetic limb through a digital format, while Figures 13
and 14
illustrate in Flow Chart format the steps of Smoothing the prosthetic limb (3D
socket)
and Sealing the prosthetic limb (3D socket) respectively.
2 0 Before
reference is made to the Figures, in general, this technique of achieving a
positive mold for a test socket in a digital format is by scanning the
residual limb. The
first step would be to choose the materials and tools needed for measuring a
patient.
Again, one would need to prepare suspension of the prosthesis (silicone liner,
foam or
other types of socket designs); a scanner; a laptop; reflective dots;
measuring tools such
as a length stick M/L gauge tape measure, etc. The method may vary by which
Distal
Device used.
After preparing oneself with the items one would need to take a digital image
of a
residual limb, the individual would use a scanner to capture the digital image
of the limb.
After the limb is captured, the individual would use a prosthetic software
which is already
known in the art, to modify the 3-D image or positive mold to achieve its
relief and
pressure points in precise locations. In essence one would modify the residual
limb with
¨6¨
CA 02857634 2014-07-23
08928781CA
the same basic techniques that are taught and used in the pre-scanner era or
plastic molds.
After modifying the mold in the desired manner via CAD, the positive mold is
designed, and the final stages of a test socket is near. Before one would
vacuum pull a
test socket, a trained individual would determine the proper plastic material,
and certain
mechanical attachments were needed. Also required is the technique discussed
earlier of
forming the plastic over the mold (drape or bubble pull). Finally, after the
plastic has
cooled to a workable form, one would clean the proper trim lines, make final
mechanical
preparations and finalize the test socket before fitting the patient.
During the fitting of the test socket, one would observe pressure points and
proper fit of the test socket. Next, one would make adjustments if needed and
fabricate a
second socket if need be. At this time, alignment can be observed and
obtained.
When the fabrication of the definitive sockets materials have cured, the
socket is
removed from the mold and trimmed out. It is then applied to the desired
prosthetic
components in the final delivery, i.e., during the fit/walk, the prosthetist
is looking for the
proper fit of socket and the correct alignment that correspond to the
patient's gait.
In the process of the present invention, the individual would receive the
aligned
test socket, then one would capture the alignment and achieve a digital
alignment via
scanners and CAD systems along with the final test socket, the images can be
merged to
create a positive mold in an alignment.
Once the digital prosthetic design is complete and approved, it is then sent
to a 3-
D printer where it is then printed or fabricated as a wearable prosthetic
limb. As stated
earlier, one such printer is sold under the trademark of Fortus which would
be utilized
in this process designed by Stratasys, although there may be other such
printers available
for use.
During this process the preferred material to provide a prosthesis and a
method to
fabricate a prosthesis constructed of a material, preferably Nylon 12, but
other suitable
materials may include ULTEM , carbon fiber, or other material of equal or
greater
strength that may be known or developed in the future, while the printers are
a product of
Stratasys Corporation or other such types of printers. After the print is
complete, the
prosthetic limb is then shipped to the prosthetist. Upon delivery, the
prosthetist will have
an aligned prosthesis and would have the ability to finish the proper trim
lines. During
¨7¨
CA 02857634 2014-07-23
08928781CA
fit/walk the prosthetist is looking for the proper fit of socket and the
correct alignment
that corresponds to the patient's gait.
Turning now to Figures 1 through 11, there is illustrated the various steps
involved in the method of the present invention. In Figure 1 there is
illustrated a
modified mold 10 of a residual limb which has been digitally produced via 3D
scanners
and software known in the industry. As illustrated, the modified mold 10 would
include
the relief and pressure points 11 of a test socket which would be actually
molded. In
Figure 2, there is illustrated a carving 13 of a modified model before it is
matched with
the test socket to be fabricated. Turning to Figure 3A there is illustrated an
actual test
socket 12 which has been constructed from the digitally modified mold 10,
which is
hooked up to an alignment system 15, having a pylon 16 and a prosthetic foot
17. In
Figure 3B, the test socket 12 has been equipped with an alignable system 21,
including a
pylon 16, together with base 23 of the alignable system 21, rather than the
prosthetic foot
17 as seen in Figure 3A. It should be noted that the actual test socket 12, as
seen in
Figures 3A and 3B, has also been equipped with a plurality of dots 20 so as to
allow the
socket 12 to be accurately scanned, as covered by the next step in the
process.
Figures 4A and 4B illustrate the images which appear of the test socket 12 as
the
test socket 12 is being accurately scanned, preferably with a 3D scanner,
along with
finalized alignment that has been recorded and adjusted by a certified
practitioner to
provide a 3-D Image of the finalized captured prosthetic alignment, or the
completed
image of the aligned prosthetic limb 22 which is illustrated in Figure 4C.
In Figures 5A and 5B there is illustrated examples of the modified mold and
the
beginning stages of transferring the alignment. It should be noted that in
Figure 5A, there
has been placed a 30mm adaption (pylon 16), while in Figure 5B there is a
shorter
adaption (pylon 16) adapted to the modified mold. The next step would be to
transfer the
finalized digital alignment of the test socket 12 to the finalized digitally
modified mold
10, as is illustrated in Figure 6. In Figure 6, the image on the left is the
modified mold 10
with the alignment attachment that can be manipulated, on the right is the
test socket 12
with the correct alignment. In this step, one is merging the alignment of a
test socket
(inner portion 24 of a prosthesis) with the final manipulated model (outer fit
26 of the
prosthesis) as one. This is done by using techniques in the software that
allows one to
¨8¨
CA 02857634 2014-07-23
08928781CA
overlap the images to cross reference the objects at hand. But first using a
certain
cylindrical tool in the software to simulate the appearance of a pylon 16
(normally 30
mm) needs to be added to the distal portion of the final manipulated model
(inner model).
This will give the individual the option of lining up the alignment or
changing it at this
time. When cross-referenced, both models should line up exactly using the
alignment
model as reference. In Figure 7, there is illustrated the final merged image
27 of both to
assure there is correct alignment which does not have to be modified or
corrected. In the
process described above, it is foreseen that in the future this process as
described herein
will be accomplished through software to be developed.
In Figure 8, after the alignment has been captured, as described above, the
next
step is to use CAD software to proceed to fabricate the type of hookup in the
definitive
socket 28; i.e., plug fit, four hole (the type illustrated in Figure 8),
support drop lock, or
any other type of industry standard connection or accommodation via basic 3D
software.
Prior to sending to the printer, it is important that each "Z" line in the
file is adjusted to
insure the strongest build of the socket with proper trim lines.
In Figure 9, there is illustrated the actual printout of the prosthesis, also
referred to
as definitive socket 28, that was illustrated in Figure 8, showing the four
hole hookup 30
mounted on the definitive prosthetic socket 28. One such printer is sold under
the
trademark of Fortus which would be utilized in this process designed by
Stratasys,
2 0 although other such printers are available. Preferably, the definitive
socket 28 prosthesis
would be printed out of a plastic material such as ULTEMS, or carbon fiber, or
other
material of equal or greater strength that may be known or developed in the
future.
In addition to the four hole hookup 30 as illustrated in Figure 9, Figure 10
illustrates a printout of the prosthesis 28 which has a plug fit adaptor 32,
while in Figure
11, the prosthesis 28 is adapted with a plug fit 34 for receiving a pylon 16
or other type of
adaptor.
As stated earlier, by utilizing this process, the prosthetist is allowed to
construct
the prosthesis with prosthetic techniques for attachments such as:
---Four hole hook up with vacuum
---Four hole hook up that will support a drop lock
---Fitting of pylon or adapters
¨9¨
CA 02857634 2014-07-23
08928781CA
---Custom attachments (for certain feet/attachment)
In the preferred method of the present invention it is foreseen that the
socket will
undergo sealing. In order to seal the socket the step will include adding a
layer of epoxy
to the exterior of the socket, which would help to add strength to the entire
socket . The
preferred type of epoxy is described as TC-1614 A/B epoxy, manufactured by BJB
Enterprises, or an equivalent type of high solids content epoxy penetrating
sealing and
coating resin, or some other equivalent epoxy sealing product, which will be
laminated
over the socket. This will seal the socket in order to be able to use vacuum
for proper
fitting, if required.
In addition to the Drawing Figures as discussed above, reference is made to
Figure 12, a Flow Chart which succinctly depicts the steps in the process of
the present
invention making reference to the appropriated drawing Figures as discussed
herein.
Reference is now made to Figures 13 and 14 which provide the new methods of
smoothing the 3D Printed Socket, as set forth in the Flow Chart of Figure 13,
and the
process of sealing the 3D Printed Socket following fabrication, as set forth
in the Flow
Chart of Figure 14.
As seen in Figure 13, entitled The Smoothing Process, the method involves the
steps that after trimming the fabricated 3D printed socket, the 3D printed
socket will be
placed in the Almco Model VB-2034 End Discharge Vibratory Finishing System, or
an
equivalent system on the market or to be invented. The 3D Printed Socket will
then will
vibrate for preferably 2 1/2 hours in the Alamo Finished System tumbler with
the rpm's
preferably between 1400 ¨ 1600 with 2 different types of ceramics, preferable
Star and
Cone, and also wear rods, which are known in the industry, for smoothing the
Socket.
Figure 14 is a flow chart which sets forth the sealing process after the 3-D
Socket
Has Been Smoothed in the manner described above. First, the 3D printed socket
is
cleaned of any leftover ceramic residue and dried. Next, an epoxy is applied
to the socket,
such as TC-1614, which is a high solids content epoxy penetrating sealing and
coating
resin system, manufactured by BJB Enterprises, or some other equivalent epoxy
sealing
product. If TC-1614 is used, Parts A & B of TC-1614 would be placed in an oven
separately, together with the 3D printed socket, preferably at 120 F degrees ,
and
preferably for 10 minutes. Next there is the step of mixing both parts A & B
of TC-1614,
¨10¨
CA 02857634 2014-07-23
08928781CA
then applying it to the 3D printed socket with a foam brush inside and outside
of the
socket. The 3D printed socket is then placed back into the oven for preferably
10
minutes. Next the 3D printed socket will then be removed from the oven and
wiped
down inside and outside to remove residual epoxy with a fabric, such as a lint
free paper
towel. The 3D printed socket is then placed back into oven for preferably 2
hours, with
the temperature remaining at preferably 120 F degrees at all times during the
process.
Following these steps, the 3D Printed socket can then be removed for assembly.
All measurements disclosed herein are at standard temperature and pressure, at
sea level on Earth, unless indicated otherwise. All materials used or intended
to be used
in a human being are biocompatible, unless indicated otherwise.
PARTS LIST
DESCRIPTION NUMBER
Modified mold 10
Pressure points 11
Test socket 12
Carving 13
Alignment system 15
Pylon 16
Prosthetic foot 17
Dots 20
Alignable system 21
Aligned prosthetic limb 22
Base 23
Inner portion 24
Outer fit 26
Merged image 27
Definitive socket 28
Four hole hookup 30
Plug Fit Adaptor 32
Plug fit 34
¨11¨
CA 02857634 2014-07-23
. .
s
' 08928781CA
All measurements disclosed herein are at standard temperature and pressure, at
sea level on Earth, unless indicated otherwise. All materials used or intended
to be used
in a human being are biocompatible, unless indicated otherwise.
The foregoing embodiments are presented by way of example only; the scope of
the present invention is to be limited only by the following claims.
¨12¨